iMAX B6 Chargers

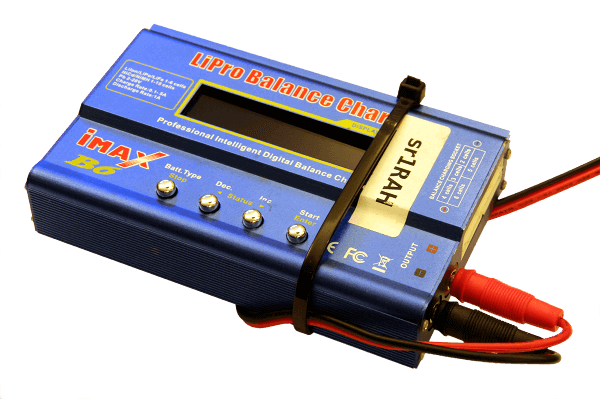
Some kits will contain a blue iMAX B6 charger. This charger is more complex than the HobbyKing HKE4 charger and has a lot of unnecessary functionality, for this reason it is important that you follow the instructions detailed below. The charging cable is cable-tied to the charger and you must not remove this cable. The charging lead is terminated with 4mm bullet connectors, which present a very high risk of shorting the battery if removed from the charger.
Charging Checklist
This list must be followed carefully each time a battery is connected to the charger.
- Plug in the mains adapter and plug it into the battery charger.
- Connect the charging lead from the charger to the battery. Ensure you plug the lead into the charger first and the battery second to avoid risk of shorting the battery.
- Connect the monitoring lead from the battery to the charger.
- Place the battery in the charging bag.
- Configure the charger using the menu system as follows. After turning on the screen should show:
| PROGRAM SELECT |
| LiPo BATT |
If it does not repeatedly press Batt.Type/Stop until it does.
Press Start/Enter to select lithium battery charging.
The following screen may be the first shown if the charger has been used previously.
| LiPo CHARGE |
| 0.1A 3.7V(1S) |
Press Inc. to select Balance charging.
| LiPo BALANCE |
| 2.4A 22.2V(6S) |
Press Start/Enter to edit the charging current.
| LiPo BALANCE |
| 2.2A 11.1V(3S) |
The current (bottom left) should start blinking.
Use the Inc./Dec. buttons until it reads 2.2A.
Press Start/Enter to store the value and to begin editing the battery voltage.
Use the Inc./Dec. buttons until it reads 11.1V(3S).
| LiPo BALANCE |
| 2.2A 11.1V(3S) |
Hold Start/Enter for 3 seconds to confirm. The charger will try to detect the battery. It must show:
| R: 3SER S: 3SER |
| CONFIRM(ENTER) |
The important thing to note here is that the number of cells detected by the charger (R) and the number of cells set by you (S) are both 3. If either of these numbers are different immediately power down the charger and contact Student Robotics.
Press Start/Enter to commence charging
| Li3S 2.2A 12.59V |
| BAL 022:43 00682 |
The screen shows the charging current (here: 2.2A), the current voltage (here: 12.59V), the time elapsed (here: 22m43s) and the energy provided to the battery (here: 682mAh).
The charger will beep when the battery is fully charged. You must then:
- Unplug the charger from the mains.
- Unplug the battery from the charging lead, do not unplug the charging lead from the charger with the battery still connected.
- Unplug the monitoring lead from the battery to the charger.
Troubleshooting
- Charger beeps and displays
CONNECTION BREAKduring charging - Either the charging or monitoring lead has come loose.
Ensure that both are fully inserted and press the following buttons to resume charging:
Batt.Type/Stop→Start/Enterfor 3 seconds →Start/Enter

